

If you’ve ever stood in front of a grimy driveway or looked at the green film growing on your siding and thought, “I really should do something about that,” this guide is for you. Pressure washing may look like a pro-only skill, but once you understand how to operate a power washer the right way, it’s one of the most satisfying DIY chores you’ll ever take on.
I still remember the first time I tried pressure washing my house. I thought it’d be a quick spray-and-done job. Spoiler alert: I blasted a little too close to the siding, learned what a kickback jet feels like, and soaked myself head to toe within 30 seconds. So trust me—starting with solid fundamentals matters.
Let’s walk step by step, from gear to technique, so you feel confident and ready to pressure wash like a pro.
What Pressure Washing Actually Is (and Why It’s Magic)
Pressure washing is essentially a form of cleaning that uses high-powered water jets. The machine you’ll be using—often called a power washer, pressure washer, or jet wash—forces water through a narrow tip, creating a stream strong enough to lift dirt, mold, mildew, pollen, and stains off surfaces.
In everyday conversations, you’ll hear people say how to use jet wash as if they’re all different skills. Most of the time, the equipment and technique are the same. The only real difference comes down to water temperature: a power washer heats water, while a pressure washer uses cold. Beginners tend to start with cold water machines because they cost less, but both will get the job done beautifully.
Choosing the Right Power Washer For Your Home
Before you start pulling triggers and blasting dirt, you’ll want the right machine.
Electric pressure washers are light, quiet, and great for everyday home jobs like siding, cars, furniture or decks. Gas-powered washers are the muscle machines. They clean faster, run on electricity, and are ideal if you have a larger property or heavy staining. But they’re noisier, pricier, and require a little more care.
When you’re comparing models, look for two numbers: PSI and GPM. PSI tells you how much force the water has, which determines how deep you can clean. GPM measures gallons per minute, which is all about how quickly you can wash an area. High PSI doesn’t automatically mean better—too much pressure can damage siding or strip paint, and beginners often underestimate how strong water can really be.
Once you choose your washer, the next mini puzzle is figuring out the nozzles. These little color-coded spray tips control the angle of the water. Narrow angles offer more force; wider angles give you gentle coverage. Most new pressure washers come with four to five nozzles, and even though they’re small, choosing the right one is a big deal for making sure your house comes out clean—not carved.
Setting Up Your Electric Pressure Washer
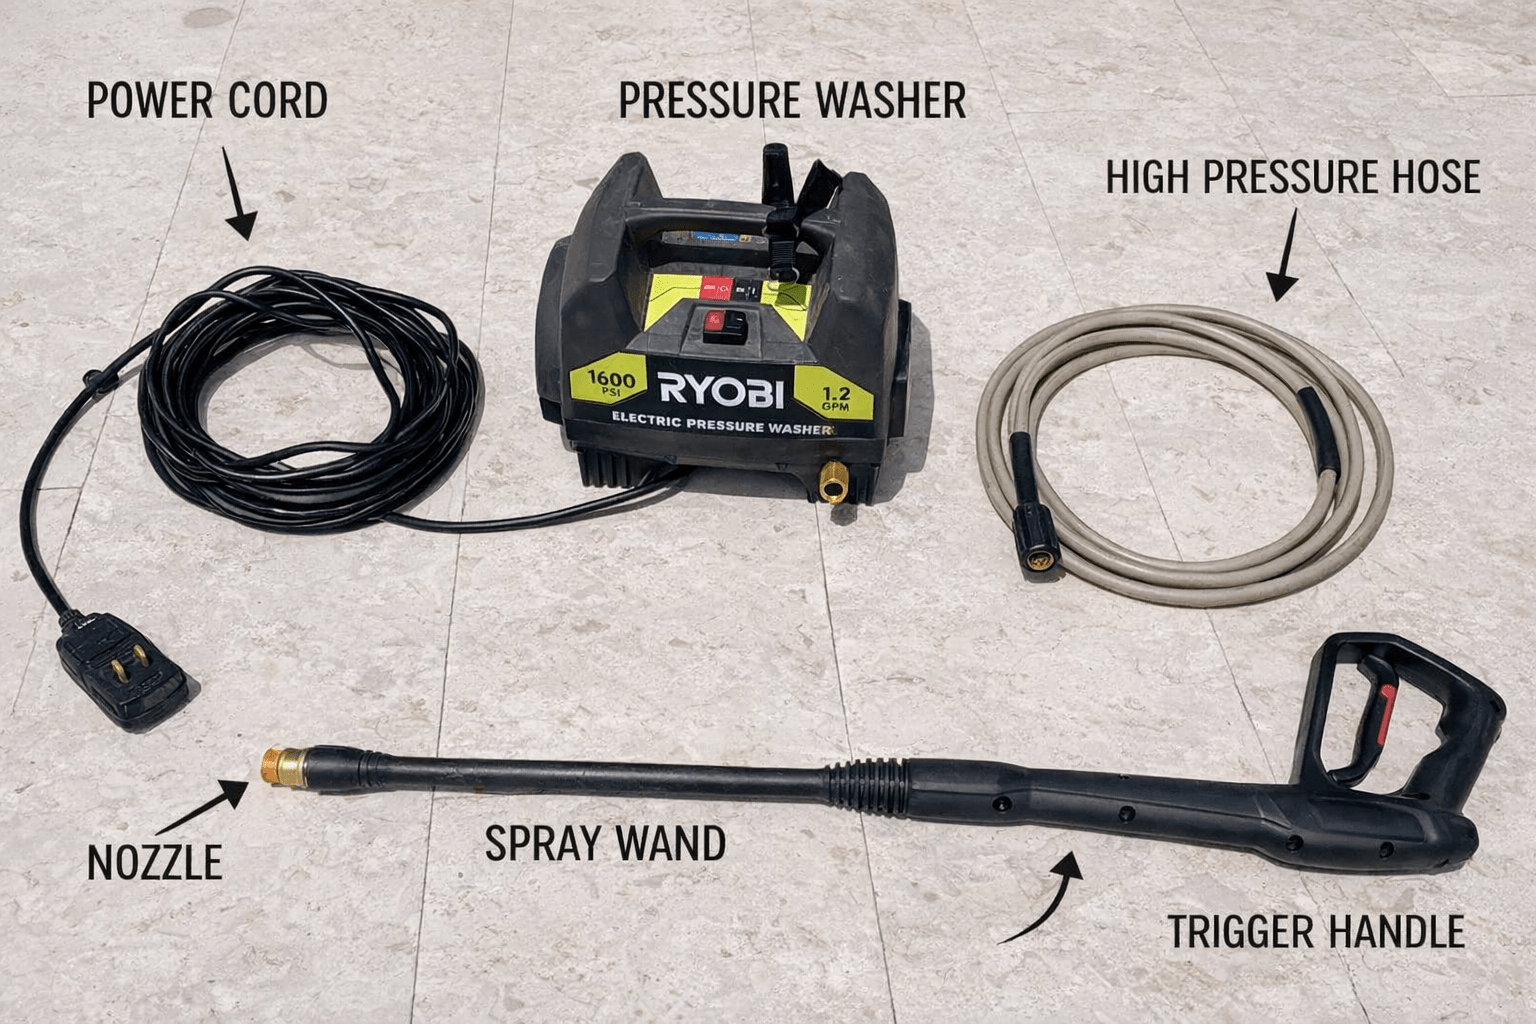 Electric pressure washers are my go-to recommendation for easily cleaning your house, especially if you’re still learning how to operate a power washer without feeling overwhelmed. They’re compact, and surprisingly powerful for everyday home cleaning. I currently use a budget-friendly electric washer and honestly, it has handled every job—from siding to patio furniture.
Most electric pressure washers come with everything you need right out of the box. You just supply a garden hose and an outdoor outlet. Setup truly is as simple as connecting water and power, but here’s a quick step-by-step so you don’t miss anything.
Quick Setup Checklist
- Assemble the spray wand
- Attach the high-pressure hose
- Connect your garden hose
- Choose & lock in your nozzle
- Turn on the water
- Plug the machine into power
- Switch it on and start washing
1. Assemble the Wand
If your washer is brand new, the wand and trigger handle will come in two separate pieces. Line up the connection and twist them together until they feel snug. After that first use, you’ll probably store them assembled, but this is the one-time step to get started.
2. Attach the High-Pressure Hose
The high-pressure hose is what carries water from the machine to your wand, so be sure it’s secured properly. Each end has the same threaded collar, so you can’t mix them up. Screw one end onto the trigger handle and the other onto the brass connector on the washer. Tighten by hand until both ends feel firm—no tools needed.
3. Connect the Garden Hose
On the opposite side of the unit, you’ll see a connection point for your standard outdoor hose. Screw the hose on tightly, just like attaching it to a backyard spigot. Make sure the hose is fully stretched out with no kinks or knots so the washer gets steady water flow.
(And yes, expandable “pocket hoses” work fine—I use one all the time and haven’t had a single issue.)
4. Pick & Attach Your Nozzle
Most electric washers include a few nozzles that control spray strength. Lighter angles are best for siding and wood; narrower ones add muscle for concrete or tough stains. If you’re still figuring out how to use a power washer safely, the middle-angle tip is usually the sweet spot—strong enough to clean, gentle enough to avoid accidental stripping.
Slide the nozzle into the brass end of the wand by pulling down the quick-connect collar, inserting the tip, and releasing it to lock. Give it a quick tug to make sure it’s seated properly.
5. Turn On the Water
With hoses attached, it’s time to open the tap. Turn your outdoor spigot all the way to make sure your machine gets full water pressure. Before powering anything on, squeeze the trigger for a few seconds. Water should flow steadily. This clears air pockets and priming the pump means smoother spraying once the machine kicks on.
If you see a kink or a weird sag in the hose, straighten it out now—weak flow affects cleaning power.
6. Plug Into Power
Most electric washers come with a long cord, but you can use an outdoor-rated extension if you need extra reach. Just be smart about where the connection sits—resting plugs on the ground invites drips. Placing them on a chair or table keeps everything safer and drier.
7. Switch On the Pressure Washer
Press the power button and listen for the machine to activate. The hose may stiffen as it fills with pressurized water—totally normal. If nothing happens, check your GFCI plug or outlet and reset it.
Once the motor hums and water pressure builds, congratulations—you’re ready to blast away dirt.
Your electric pressure washer is now fully set up and ready to roll. The more often you wash, the faster this process becomes, and before long you’ll be the confident one teaching neighbors how to use power wash gear like a pro.
Before Cleaning With a Pressure Washer
Before you go full blast with your machine, it’s worth slowing down for a minute and getting set up the right way. A pressure washer is incredibly satisfying to use, but that same power can cause damage—or a surprise sting—if you’re not prepared. These quick reminders will help you stay safe, protect your surfaces, and get better results from your first cleaning session.
- Wear closed-toe shoes and long pants to shield your feet and legs from accidental spray. High-pressure water can sting or even break the skin if it hits you directly.
- Clean from top to bottom so dirt naturally falls downward. If you wash lower surfaces first, grime from above will undo your progress.
- Always test your spray in a hidden area to make sure the pressure isn’t too strong. Start farther away and move closer only if needed instead of blasting at full force right away.
- Avoid delicate or easily damaged surfaces like windows, soft woods, and vinyl siding. Stick to tougher materials first—concrete, brick, stone, decking, or outdoor furniture are great beginner surfaces.
- Keep an eye on your hose and power cord as you move around. Electric washers are lightweight, but kinks, tangles, and tripping hazards can pop up fast.
Ready to Wash? Here’s How to prepare for the cleaning Step-By-Step
Now for the fun part. Once you know how to use a power washer, the actual cleaning feels incredibly rewarding. The key is to take it slowly and start with control.
Step one is preparing the area. Move anything that might be damaged—patio cushions, potted plants, toys—and give the surface a quick sweep or rinse. It sounds like extra work, but pressure washers perform better on surfaces that aren’t covered with loose debris.
Next, hook everything up. Attach your garden hose, connect the wand, and pick the proper nozzle. If you’re using detergent—and I recommend it especially for mold or siding—load the solution into the soap reservoir or attach the siphon hose. Eco-friendly soaps are better for plants and won’t leave residue.
Starting the machine is different depending on whether yours is electric or gas. Electric models are simple: plug in, turn on, squeeze the trigger. Gas washers may require priming and pulling a starter cord, similar to a lawn mower.
Here’s where technique matters. Always test your spray on a small, hidden patch. Hold the wand at a 45-degree angle and keep a comfortable distance from the surface—usually around 12 to 18 inches for siding and decks, and a little closer for concrete. Keep the spray moving at all times. Staying in one spot too long carves patterns and can leave bright streaks that don’t match the rest of the surface.
Finish with a rinse using a wider-angle nozzle. Rinse from top to bottom, so dirty water flows down and off instead of splashing onto areas you’ve already cleaned.
By the time you’re done, you’ll understand why so many homeowners fall in love with pressure washing. It scratches an itch you didn’t know you had.
Pressure Washing Your House Without Causing Damage
If your primary goal is pressure washing your house, siding is usually where you’ll start. Vinyl siding is fairly beginner-friendly. Just watch out for gaps where water could sneak behind the panels. Wood siding looks beautiful but needs more respect—use lower PSI and keep your distance so you don’t fuzz the grain or peel paint you want to keep.
Brick and stucco seem sturdy, but older mortar joints can crumble if you blast them too hard. If you spot a crack or hole, avoid it completely or switch to hand scrubbing.
Many homeowners notice mildew. Soap plus the right spray angle solves this quickly, but don’t forget to rinse it away. Leaving cleaner residue can attract more dirt later.
The main rule: if you’re unsure—step back, use a wider nozzle, and lighten the spray.
Other Surfaces You Can Clean (and the Ones You Shouldn’t)
Once you finish the siding, chances are you’ll look around your yard and realize everything else is dirty too.
Driveways are next-level satisfying because concrete holds stains like oil, tire marks, and winter salt. Soap helps break the grime loose, and a slower overlap pattern leaves a cleaner finish. Decks and fences take longer but transform beautifully. Just remember wood has limits; if water starts shredding fibers, back off immediately.
Patios, outdoor tables, grills, fences, and even garbage cans respond well to a power wash. Cars can too—just switch to a gentle nozzle and keep enough distance to avoid forcing water into seals.
One thing to skip is anything electrical, delicate landscaping, and surfaces that can trap water or hide damage.
How to Use Jet Wash Like a Pro
Even though we’re talking about the same machine, the phrase how to use jet wash often pops up when people mean advanced technique.
Angle makes all the difference. Blasting straight on is the rookie mistake; it forces water deep into cracks. Aim downward or sideways so dirt flows away naturally. If you’re cleaning wood, follow the grain. It prevents streaking and preserves the finish.
I always tell beginners to treat pressure washing like mowing a lawn—slow, controlled, overlapping passes. That’s how you avoid tiger stripes or swirl marks.
If you want to clean faster, don’t crank pressure higher. Instead, pre-treat stains, let soap sit a few minutes, and then wash. You’ll be amazed how much easier dirt slides off.
When to DIY and When to Call the Pros
Pressure washing is one of those tasks most homeowners can learn on their own. If you have single-story siding, a small deck, and enough time for weekend projects, you’re absolutely capable.
But there are moments when calling professionals is the smart choice. Two-story houses require ladders and can turn risky quickly. Heavy mold growth or bricks with aging mortar should be handled by someone who knows how to apply lower pressure without causing damage. If your paint is older than a decade, blasting it might reveal problems you weren’t prepared to tackle.
It’s also worth weighing the cost. Buying a washer might make sense if you want to use it often, while renting one or hiring help may be cheaper if you’re only cleaning once a year.
Common Pressure Washing Problems (and How to Fix Them)
Sometimes, things don’t go as smoothly. If your washer isn’t building pressure, check for a clogged nozzle—it happens all the time. Machine pulsing usually means air in the system or a kinked hose. If soap isn’t dispensing, make sure you switched to the soap nozzle and that the detergent hose isn’t blocked.
Streaks on surfaces mean you’re moving unevenly or not rinsing properly. The good news? These are almost always fixable with a second rinse.
Keeping Your Pressure Washer Ready for Next Time
Once you’re finished, don’t just unplug and walk away. Turn off the machine, drain leftover water, remove pressure from the hose, and give the tips a quick clean. If you live somewhere with freezing winters, store the washer in a warm place so water doesn’t expand inside the pump and damage it. With simple care, most home washers last years.
Final Thoughts
Now that you know how to operate a power washer, the next steps are all about practice and confidence. Start on driveways or patios, graduate to siding, and before long you’ll find excuses to clean everything in sight.
The satisfying before-and-after results alone are worth the learning curve. Plus, pressure washing isn’t just about spotless surfaces—it protects your home, keeps mold from spreading, and boosts curb appeal in a single afternoon.
So roll up your sleeves, pick a sunny weekend, and let the water do the work. You’ll wonder why you didn’t start sooner.